Weekend Freedom Machines banner
21 - 40 of 240 Posts
I hope Justus will come back with pictures, drawings, and explanation of his two plate system. The threaded rods may work, but once you get the correct height it is a one time deal. I have not put the PTO on yet or used anything electrical but the starter so far no problem. I am a certified electrical dunce, have papers and everything. I can connect the red wire and black wire to the battery the yellow, blue and white wires not so much. I have an old GM alternator that I plan to attach to the rear PTO shaft. I don't expect this to be a huge job but I have been able to outsmart myself before. I am concerned about what color wires to use.:read:
 
Image


I had routed the 318's choke cable around the right side to the front a couple of weeks ago. Not having my local dealer two miles from my door as I once did had given me some pause about how to handle the speed control. There was no question the one on the 318 was too short. I had not been able to find one with the right end anywhere. Everyone told me you'll have to get that from deere. I got to thinking when Gerry G. put the 23 HP Vanguard in his 140 he ran the cable straight into the carb. I pulled the cable out from under the battery tray and punched a 3/8 inch hole in the firewall (no I do not know why the PO has duck tape on the firewall). The cable tie down was not threaded just a hole. Put a couple of nuts on a bolt and it looks like it is going to work. There was just enough cable to make the turn. Getting that little "L" twist in the hole required removing some stuff but it all seemed to go back on okay.
 

Attachments

Image


I found by google a nice thread from this site about shims and installing pto's on repowers. Thought I saved it but can't find it even using google. Forgot the magic words.

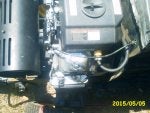
Another of my out of focus pictures. Shaft of a Harbor Freight Predator 670. About 2.75 inches of 1" diameter shaft increasing to probably 1 1/8 " diameter then increasing to probably 1 7/16" for sure NOT matching the 20 HP Honda I took the 317 PTO from. I had figured since it worked on the Honda it would be a straight swap to the Predator. As (I wish) you can see in the picture I have placed a 1/4" inch plate to the engine. There is at least a quarter inch space behind the plate before the threaded rod contacts and on the front side there is at least a quarter inch from the plate to where the shaft drops down to one inch.

I plan to make 4 studs to attach the PTO to the engine. Either using the plate and a quarter inch nut or maybe just three quarter inch nuts on each stud.

I sure do like it when a plan comes together. Several days and I don't even think this one is close?

****************************************************************************************************
:happy: I went back and played with google for a while and found the thread I was looking for. BUT trying to find it on this site using advanced search is above my ability. :cry:

****************************************************************************************************

*************************************************************************************
http://www.wfmachines.com/forums/showthread.php/1893-318-repower-PTO-HELP-NEEDED-PLEASE

*************************************************************************************

:read: I have read this several times and think I almost understand what needs to be done until I read it again and think I'm not sure. Thank goodness I don't have any clay cause where I would stick it doesn't agree with my understanding of the pictures?
 

Attachments

I put in the 4 studs, put 2 - 3/8 inch nuts on each then the 317 PTO. When putting 12 volts to it I can hear the clutch engage. Without having the clutch engaged everything seems to turn freely with the engine running. I haven't engaged the clutch with the engine running (cause I'm chicken). What is going to happen if I have too much gap?
 
Well no one answered and I really wanted to know so... I hitched up a mower and borrowed a belt I thought would fit. It went on but was REALLY tight. Cranked it up ran the PTO at idle for a few minutes and shut everything down. The mower turned the PTO turned the belt stayed on. Took a break. Rechecked the PTO, mower, and belt. Didn't find any problems so went with the next test. Cut grass for a half hour. Smelled the belt a couple of times.

Plan to get a longer belt tomorrow. How many inches can the adjustment on the mule drive handle? Right now it is turned counter clockwise as far as it will go (loosen). Not sure of the effect of a belt a couple of inches longer... Any ideas???
 
Tried a 90" belt from TSC, liked the fact that I could adjust the tension with the mule drive knob. Mowed for an hour everything went well. Checked the battery voltage (12.70) I am thrilled as it appears that at least for a hour the charging system held its own while using the electric PTO.


BE SURE YOU CAN FIND A REPLACEMENT AIR FILTER BEFORE YOU BUY THIS 22 HP Harbor Freight 670 ENGINE.

If you know where to get one please let me know.
 
That great that you have it up and mowing.


Tried a 90" belt from TSC, liked the fact that I could adjust the tension with the mule drive knob.


BE SURE YOU CAN FIND A REPLACEMENT AIR FILTER BEFORE YOU BUY THIS 22 HP Harbor Freight 670 ENGINE.


I've used the TSC belts on my 120 and 140 and they lasted about 20 to 30 hours of mowing. I've tried others also and the same thing, but a JD belt lasts about 3 seasons.
If you cannot find a replacement air filter, you could make (or have someone make) a new filter box that would fit a common filter. Just let us know if you come up with one.


I hope to get the restoration of the 2 314's I'm working on done soon, and then I'll get back to the 2 140's I started several years ago. I'm looking maybe using the same engine to repower one of them. I have a home machine shop and I'll be able to make everything I need if I do the conversion.
 
Jeff,
For my the Honda GX670 I add the valve sold by Honda.
The part # is: 15558-ZJ1-010AH
Some description on eBay said M14x1.5

For my 318 this valve is too long then I had to drill a hole in the frame.
Then I drill the hole big enough for a 10MM socket.

This valve didn't solve the mess when replacing the oil filter.
I made a kind of bath and drain to grab the oil from the valve and also the filter.

I still have to add gasket maker at the bottom and side of the base of the engine.

Image


Outside I add this box and pipe:
Image


I have to solve a problem, the oil flow from the filter create a curve to the front outside the bath. :-(
I still don't know how to solve this problem because with the new paint and the motor installed I don't want to weld anymore.

This is the first test:
Image


Andre
Image
 

Attachments

Couple things an extractor won't solve the oil that leaks when the oil filter is removed however raising the opposite side of the tractor an make a small hole in the filter may be able to drain the oil inside the filter into another container.
Shady was there a part number for the filter? Maybe a Google search will reveal something? If Harbor Freight is putting their name on it they should be able to source one for you.
 
21 - 40 of 240 Posts