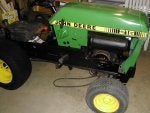
I took a 1979 Deere 216 (s/n C216H096103M) as partial payment for my 44 two stage snow blower.
Unsure what I am going to do with this tractor when restoration complete. I have no 2XX attachments to use on this tractor. If sons do not want it I am thinking about getting a integral hitch and plow and start farming.
Photos showing work completed to this point.
- The tractor had not been run for a number of years but had been stored inside.
- The tractor and mower deck appeared to be complete. The deck included cover but was missing the chute which is typical on these vintage Deere machines.
- There was no battery so could not test compression. Spun the engine over by hand and there was compression indicating engine was not froze and valves were functioning correctly.
- Engine was covered with years of dust and tins were in dire need of paint.
- Muffler was rotted out and needed replacement.
- All tires are severely weather checked. Fronts have tubes. Rears do not. The right rear tire does not hold air and goes flat over night.
- Tread depth on tires would indicate the tractor is low hour or never operated on hard surface.
- Seemed like a good restoration project.
- Spark plug threads stripped out of head ... installed helicoil.
- Headlights will not work as wire harness is separated from spade at front connector.
- Mower bearing are not froze but very hard to turn.
- Deck has had weld repair around the front draft arm brackets. Repair was made without adding patch panels and the right side bracket has recracked alongside the weld bead the total height of the deck.
- Unsure right now if deck will be restored or replaced.
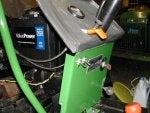
- Removed fender deck, fuel tank, battery tray, engine shields, and hood assembly.
- Pressure washed tractor.
- Flushed fuel tank. This is something I do on all old tractors.
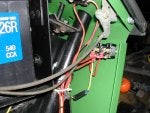
- Installed new shutoff valve, new fuel line to fuel pump, and added a fuel filter which is not a feature on this tractor.
- Removed, cleaned, and rebuilt carburetor. Installed new gaskets and fuel line between fuel pump and carb.
- Removed and painted engine upper tins and tins around the muffler.
- Since the tins were removed felt this was a good time to remove head and de-carbon pistion/head.
- This is when I found stripped spark plug thread. As noted earlier this was repaired by installing a helicoil. New head gasket was installed during reassembly.
- Forgot to order breather filter and hose between breather and back side of air filter housing. Those should be in tomorrow but I have to deliver loader I sold so this work will continue next week.
- Front part of frame, battery tray, engine tins, front axle, tie rods, and front rims have been cleaned up and painted.
Unsure what I am going to do with this tractor when restoration complete. I have no 2XX attachments to use on this tractor. If sons do not want it I am thinking about getting a integral hitch and plow and start farming.
Photos showing work completed to this point.